Showing posts with label framing. Show all posts

Sunday, March 15, 2026

FINAL Call for Entries: New England Art Club Annual Exhibition 2026

You have until 12 noon on Friday 20th March to submit your entries for the New England Art Club Annual Exhibition.

While the seriously committed will have submitted their entries already, there's still time to submit that work which you are pleased with.

Historically, the New English Art Club was founded by a group of artists dissatisfied with the entrenched attitudes of the Royal Academy

Today, its intent is spelt out by its President Patrick Cullen

At the heart of the NEAC is the search and propagation of meaningful, resonant art. It is committed to authenticity through the observation of life, as well as the task of articulating and communicating ideas with the beauty of skilful language.

FINAL Call for Entries: NEAC Annual Exhibition 2026


Entries from open artists are welcomed.
The NEAC Annual Exhibition is a showcase not only for its members but also for aspiring artists: with a history going back more than a hundred years, it is an opportunity for work to be seen alongside some of the best artists today.
I describe the process below. Here are the links to all relevant pages
NEAC is not an art society which is afraid of colour!
(NEAC Annual Exhibition 2025: End of West Gallery)

If you want to know what NEAC is about, take a look at my pics of the 2025 Annual Exhibition

Last year, the exhibition 389 artworks which included a lot which were big to very big - which made the hang look very crowded to me

Guidelines re Sales and Pricing

You can see the nature and price of the artworks which sold in 2025 by right clicking HERE and opening in a new tab

  • 60% were painted in oils
  • just over 20% were landscapes and cityscapes
  • just over 10% were portraits
  • just over 10% were still life
  • the remainder covered marine and coastal (4), other (1) and abstract (2)
In terms of sales, 17 of the 50 sales were by open artists - and the majority were by women. I think it not unlikely that most of the sales were heavily influenced by women too.

For the record, although I've not crunched the numbers for 2025, there are some guidelines for open artists if you want to achieve a sale
  • sales drop off once you breach £1,500 which I've identified for a long time as an important threshold for sales (i.e. not a lot above this, and these are mostly by members)
  • OPEN ARTISTS tend to do better in the £500-£1000 price range and pricing - and this is consistent across a number of the art societies exhibiting at the Mall Galleries

Monday, December 01, 2025

Review: Royal Institute of Oil Painters Annual Exhibition 2025

There's a new look to the Annual Exhibition of the ROI  - which is an annual exhibition that features a variety of oil paintings by both established and emerging artists, the majority of whom are members of the Royal Institute of Oil Painters.

The theme of this year's ROI Exhibition is "Home"

I visited last Wednesday for the PV and Awards Ceremony and then again on Saturday afternoon to finish my photographs and it gradually dawned on me that it felt and looked different - and then slowly I realised why that might be.

The Demographic Change

It took a while to work it out - and then I realised, almost all the "old guard" who I've been seeing in the Annual Exhibitions for the last 20 years have almost all gone

Of those still alive, relatively few are still painting and exhibiting. 

It feels like the overall demographic of ROI members has really changed - so there are now many more younger artists and many more female artists.

  • Older members have been replaced 
  • by much younger artists who have done their bit as open artists and 
  • who have now progressed to becoming members and 
  • in turn, some of them are now officers of the ROI in their middle age. 
I'm now older than most of the people running the show - which feels very different for me too!

I remember well walking around the ROI annual exhibition in 2010 with Adebanji Alade PROI while we discussed how we could make even more of an impression than he was already and become a member!

Last Wednesday, I saw him deliver the most electrifying tub thumping awards ceremony I've seen in years - as President of the ROI. It feels like maybe the engine room has had an overhaul and there's a new drive to reinforce and develop the ROI. 

While on the wall next to the cafe, very sadly, there's a record of a number of the stalwart member exhibitors of the past who have died in the last year. The last year we lost so many in one year was 2022. These included:

  • Fred Beckett FROI (1933-2025) who was an ex President of the ROI and the Wapping Group; 
  • John McCombs ROI (1943-2025) who never grew tired of painting the Pennine village of Delph and 
  • Brian Ryder (1944-2025) -  whose landscapes I always looked forward to seeing and who never ever had a painting rejected by the ROI.  I found these "bon mots" on his website - which I'm sure some of you will value
  1. Art is not what we see but what you can make others see.
  2. Only when he no longer knows what he is doing does the painter do good things.
  3. A painting requires a little mystery, some vagueness, and some fantasy. When you always make your meaning plain you end up boring people.
  4. Painting is easy when you don’t know how, but very difficult when you do.”
So it felt a bit like you do on New Year's Eve - it's goodbye to the old guard and hello to all the new much younger painters hoping to become members as well as those who have been around a few years and are now running the show!

Interestingly most of those new artists are ones I first came across online. 

 It was good to see that Greg Mason has now become a member and taken over the role of looking after the website and social media  (PS You may remember Greg from Landscape Artist of the Year - when he abandoned the chosen view and still made it to the Final! (His blog post / My Blog post. For the unitiated, I have a memory like an elephant and an archive which services it well!!)

This is his video tour of the exhibition

Monday, April 08, 2024

Review: The 7th Derwent Art Prize (2024) Exhibition

This is a summary of my thoughts about the Derwent Art Prize Exhibition at gallery@OXO. This is in addition to:

The aim of the Derwent Art Prize Exhibition is to 
  • reward excellence by showcasing the very best artworks made in pencil by artists from around the world.
  • showcase c.80 artworks in an exhibition.
The Prize invites artists to submit the very best 2D and 3D artworks created in any pencil, including colour, water soluble, pastel, graphite and charcoal pencils.

This year, the Judges shortlisted just 68 artworks, however 2 artworks did not make it on to the walls because they got stuck in Customs! See the end for tips for getting your work through Customs

I'm writing this post essentially for all those who might like to submit artwork to the next Derwent Art Prize because, although you can see the images online, you cannot see how they are presented. 

That said, judgement is always on the basis of the digital image of the art.

Artwork at the entrance
varying sizes, subjects and presentation


My perspective on the Derwent Art Prize Exhibition 2024


First off, the main point I want to emphasise is that there is a lot of exceptionally good artwork in this exhibition. I'm guessing that the reputation of the Prize - and the fact it's still going - means that this prize attracts many more professional artists these days as well as young / aspiring / emerging artists.

For me, the appeal of the exhibition is that:
  • it often presents novel perspectives on the very ordinary 
  • as well as extraordinary insights into the very unusual. 
  • ALL delivered while demonstrating an exceptional degree of technical accomplishment.
Essentially, it's NOT artwork which is technically good but actually dull - as much hyperealistic artwork can be.

Nor is it exciting concepts which are then delivered by people lacking in skills associated with creating art - which is the sort of art I hate.

To get selected, the artwork has to move mind or spirit AND also be executed by somebody who demonstrates they're very good at wielding the media used for pencil art.

For me, it has come on a lot since the very first exhibition - which I remember really well because it demonstrated news of thinking and recording in pencil media.

I'd just like to see some 3D artwork next time!

PS There are emphatically no cats, dogs or horses or any other sort of animal mammal in this exhibition! There is one very dead bird.... (Just saying....)


The exhibition demonstrates a wide diversity in terms of
  • styles
  • subject matter
  • size
  • age of the artist
  • country where the artist lives
It is truly international - with over 6,000 entries by 2,324 artists from 77 countries

That means it's getting an entry way bigger than most of the prominent open art exhibitions of national art societies!  One might be tempted to ask what is this art competition offering that other open exhibitions are not. My answer would be "big cash prizes". Any time you have an art competition with very significant cash prizes you get a lot of entries.

Friday, July 30, 2021

How to list artwork dimensions

Which way round should the dimensions of artwork be listed when providing information about an artwork (i.e. drawings / paintings / prints)

Height and then width OR width and then height?

There appear to be a diversity of views. My own personal view is that it should always be height and then width.

One of my personal missions in life is to persuade all art competitions and open exhibitions to get their forms right and list the dimensions the right way round! Hence this post!

So I decided to take a look to see if I could prove I was correct - having been irritated, yet again, by seeing artwork on a website with the dimensions listed (in my opinion) "the wrong way round"!

I looked for sources of information from:

  • leading art galleries and museums
  • reputable websites
HOWEVER I also found that there was a different perspective in the graphics and digital image / photography world!

So the answer is "it depends on what your are measuring" BUT 
  • if you're measuring artwork then there is only one right answer!
  • it's different if you're measuring photographs!

According to Art Galleries and Museums

It's height then width and then depth.

I'm listing below the art galleries and museums which were reviewed - with artwork inspected on a random basis. Plus I'm including some images from those websites to prove what I'm saying!

Basically I stopped looking after the National Galleries of the UK and USA plus the Louvre in Paris. I've no doubt there may be some cultural dissension on this matter in places where people read from right to left - but I'm only trying to persuade the organisers of juried exhibitions in the West to get it right. I've not gone for global domination - yet! ;)

Dimensions at the National Gallery (London) - height first and then width
A Young Woman Standing at A Virginal by Johannes Vermeer
51.7cm x 45.2cm

Height first - then width

  • National Gallery (London)
  • National Gallery of Art (Washington)

Monday, February 08, 2021

Framing your artwork - a summary

This is a summary of my various blog posts about framing artwork - written over the last 15 years. Much of it is perennial advice.

Today I searched my blog for a particular post I wrote about the sort of frames which artists use for contemporary artwork in London Galleries.  Which is when I realised how many posts I'd written about framing!

All about Framing Artwork - a Summary

A frame has four main purposes. It serves to:
  • support and protect the artwork
  • make it easier to hang
  • separates - and connects - the painting from its surroundings
  • enhance its presentation - and avoids our attention being distracted from the painting

However that's just the basics - there's a lot more to framing artwork! 

Below is some of what I've written about frames on this blog. Links in the title of the blog post take you that post.


"Symonds Yat - blue green and gold" by Katherine Tyrrell
coloured pencil image 12" x 16"; frame 50cm x 60cm
ivory double mat and framed in American Oak by 'b2'
- with protective film for transport


How to frame your art


Getting ready for an exhibition is always a time when I try to remember all the tips I've ever had from anybody about how artwork should be framed. I thought it might be timely to try and record some of them and this post is a summary of tips for how to mat and frame artwork.


Protecting Frames


  • Protecting your frames (2007) - passing on a tip from my framer about how to avoid damage to your frames (see also image at top)
(my framer) always cling films the framed picture so that the frame edges are covered when they are stacked. This provides good protection and helps to prevents marks being made on the frame during the stacking process. It also means I can avoid using cardboard corner protectors which (a) add to the space required and (b) results in exhibitors normally asking for them to be removed prior to stacking if space is limited!


Frames and Style


Five of the series of paintings of Poplars on the Epte by Claude Monet

One of my framers told me a long time ago that the bulk of his business came from replacing frames on artwork. The collectors liked the artwork but the frame simply didn't fit in their home - and it had to go.


Frames and Selling Art


SOLD ARTWORK: Types of frames relative to sale price


  • Do frames help to sell art? (2015) - this tells you what happened when I went to an annual art exhibition of a prominent art society - and started to count what sort of frame the SOLD artwork had....

Frames and Money Management


how to avoid frames eating your profit
Published in "The Artist" 2016

A frame can make or break a sale. Framing can also cost a lot and eat into your profits. However, with a bit of effort you can achieve good looking framed art while controlling costs and increasing profit.
  • Poll Results - Size Matters! () - I asked in a Making A Mark Poll what was the primary reason for the size of your artwork and 125 people responded.
Just under a third are mindful of pragmatic and financial considerations with respect to framing for exhibitions and sales.
The disinclination to spend any more than around $160 seems to be approximately the same as UK artists disinclination to spend more than £100

Framing and Art Competitions


Frames stacked on the Receiving Day
for the Open Annual Exhibition of an Art Society

Don't be parochial - and don't make personal preferences the deciding factor in framing choices. You are NOT framing for your home - you're framing for an exhibition and (presumably) to sell.
Make sure you can get your work framed correctly. Book your framer well in advance. Do not assume that they can turn around your frames in the time you've allowed. Remember that framers do have holidays! I'll never forget the August that I couldn't find a framer who could dMore about Framingo my framing in time for exhibition deadlines!


Framers


the studio of an 18th century German framework gilder

Hanging Picture Frames


More about Framing Art


You can find out more about Framing on my Art Business Info for Artists website.

The section on Frame Art includes
  • How to frame art
  • General tips about framers
  • General tips and frames
  • What sort of frame design / moulding / wood? - Different styles and types of frames
  • Framing for open exhibitions and art competitions (summary) - also see dedicated page
  • Framing for gallery exhibitions
  • Framing for commissions (summary)
  • ​Protecting your frames
  • How to store finished artwork

Friday, April 10, 2020

How to hang a picture

In the current context rehanging your art collection is one off those jobs you give yourself after you've cleaned out and reoganised all your kitchen cupboards and wardrobes  and rearranged all your books on the shelves.

Here's a page about "How to hang a picture" which you might find very useful.
This page covers:
  • TIPS on how to hang paintings, drawings, fine art prints and photographs
  • Basic kit for hanging pictures
  • How to hang art in a frame on a wall - including tips for using specific frame hanging fixture kits
  • Specific hanging tackle: D rings, picture wire, picture cordand stud finder!
  • How to hang a heavy picture on a wall
  • How to hang and align pictures.

Hanging gear laid out in a frame at Green & Stone, Chelsea

The page also brings together on one page all my previous writing about how to hang art.

More posts about framing


Wednesday, April 26, 2017

A list of recommended picture framers

All artists appreciate a recommendation about a framer. 

You know how this works:
  • if you want a recommendation you need to share who you recommend!
  • if you want the good framers to stay in business, we need to make sure they get asked to do lots of work!
  • plus you do everybody a great service it you provide recommendations on your website for:
    • the materials you like to use and 
    • the framers you patronise because you get a great service 
the studio of an 18th centuryGerman framework gilder

List of recommended picture framers


The next logical step is a list of recommended picture framers. Which is where I come in...

I get absolutely no financial benefit from doing this. Like my blog it's just something I'm doing and sharing - because it helps people

I just know this is information artists need and it works better if there is somebody who provides a list.

So that's what I've done

On my my Art Business Info for Artists website, I have a DEDICATED page for a List of Recommended Picture Framers
  • These are framers who are recommended by artists who have used them - on the artist's website or blog.
  • they are listed in two different ways:
    • traditional vs online
    • geographical location - in the UK and Ireland
At present the listing is limited to the UK and Ireland but there's no reason why it shouldn't include people around the world.

There's just one thing - the recommendation has to come from the artist and there needs to be evidence of a recommendation on his or her website or blog.

View of a framework mill, oil on canvas
Dorotheum

You are very welcome to add your recommendations to this list

If you'd like to recommend a picture framer this is what you do.
Complete the form at the bottom of the website page
  • state your name and your email address (ie recommendations cannot be anonymous and can only come from artists)
  • state the name of the Framer, where they are located
  • Identify the URL of a website or blog where you recommend this framer online. If you haven't recommended the framer online then the framer cannot be added to this listing.
By way of explanation, it's more convincing as a recommendation if you also list them on your website and/or have examples of their work on your website.

Who do you recommend as a picture framer?

Below are links to more of blog posts about framing and hanging pictures.

Links to more blog posts about framing


Thursday, September 08, 2016

All the mistakes you can make when submitting work to an art exhibition

Who hasn't had an awful experience when preparing for an exhibition?

16 things that can go wrong when submitting art to an exhibition


Here's a list of things that can go wrong. If you leave a comment and come up with a good one I'll add it to the list. A lot of what's on there comes from stories people have told me. I swear I haven't made all the mistakes myself - just some of them!

1.  Don't read the call for entries and rules properly 

One loses count of the stories heard of people not realising that the media used or the subject of their artwork or their country or their status doesn't allow them to enter!

2.  Get the submission date / deadline wrong 

I think probably most of us have done that one. Ranks alongside forgetting the date of your examinations. The effect on your insides is about the same. If you're really, really lucky you don't paint in oils and realise you've got the date wrong with at least a couple of days to spare.....

3. Realise far too late that the custom built frame makes your artwork too big to enter 

I think there are three strategies on this one but I'd be interested to hear more
  • EITHER Say absolutely nothing and cross your fingers that the organisers won't reach for their tape measures. This is the only one that works - sometimes. Some have done this and got their work accepted; 
  • OR ring up and ask the organiser whether it would still be OK to enter it. You know what they're going to say so basically you've just spent money on a wasted phone call; 
  • OR put the very considerable expense down to a learning curve. One you won't be repeating....

4. Realise far too late that your cheap bargain frame makes your artwork look cheap too

There's absolutely nothing wrong with a cheap robust frame; the trick comes in making them look simple but expensive! I believe in bone coloured paint!

5. Fail to complete your artwork on time 

This goes without saying. Who hasn't been there? There's the artwork you submit and then there's the artwork you meant to submit.  Then there's the first two versions in which you tried to get it right and the one you submitted because you have now given up the will to live!

6. Fail to get the artwork to dry on time

The same as above but only for those working in media which takes forever to dry!  This one tends to go with resolutions to "never ever use xyz again!" because you've been caught out by changing your normal media.

7. Find out that the varnish destroys the finish

You're using new media - and forgot to test it with the varnish before you started to use it!  Often comes about (but not always) as a result of not reading the tiny tiny print on the side of the container.

8. Find out that the fixative makes your media run

Not every fixative likes every dry media. On one memorable occasion I recall a friend telling me a very sad story about working on a commission and then watching her coloured pencil media drip off the support after she applied fixative. It literally became liquid and slid off the support!

9. Forget to take a proper professional image/scan/photo of the artwork before it is framed

We all live in hope that this is the last time we'll see the artwork if it is for sale so we need a good image of it . However does this mean we remember something we need to do every single time when we submit work to an art exhibition. Of course we don't!!!

There's a variation on this one which is that you don't look at the pics you took until after you have submitted the work.

Which explains this really dreadful group shot of my artwork for Florum! I eliminated the reflections on the glass - and the definition in the photo....

(Top row) Massonia bifolia
(Middle row): Crassula Buddha's Temple; Cardiocrinum giganteum Seeds pods study
(bottom row) Astrophytum and Haworthia - Spots and Stripes

10. Neglect to book the framer in time 

This one comes with a variety of options:
  • you didn't know your old framer has died/disappeared to beat the creditors/packed up and not told you
  • how were you supposed to know that your framer likes three week holidays just before the busy season for submissions?
  • your framer is so good he's now booked solid for the next six months
  • your framer is good but can't help you and he's not telling you about anybody else who is as good as him!
This is when you learn to frame for yourself!

Or alternatively inspect my List of Recommended Framers 
(New names always welcome - just post something public that I can reference about your framer and why you like him or her - and then complete the form at the bottom of the page)

11. Break the glass in your frame

You can do this any number of ways but my favourite - and the one that gives me collywobbles every single time is taking it out of the frame so as to clean both sides. Especially when you nearly drop it as the sharp edge cuts your finger and very nearly drops on to the artwork which is nearby.... (Been there, done that!)

12. Scratch the frame badly during transport 

You've probably just ruled your work out of being hung and all for the sake of proper packing materials.

However if you notice in good time you can sometimes work magic with sandpaper and paint. (Guess who's done this one?)

13. Send the artwork via a man with a van - who can't find the destination on time

It happens and has happened. It pays to use those who have developed a good reputation.

(see Fine Art Transport - For those who 'need to know'​ how to pack, mail and ship art)

14.  Fail to build in contingency time for getting to the hand-in on time

So yesterday my partner stopped me from banging on my horn and screeching at the delivery driver who was blocking the exit from my cul de sac to "*&^%$£ get out of the way" on the basis that this would only make him slow down. I can also do getting out of the car, saying nothing and reaching for my iPhone and taking a photo of the illegally parked vehicle. But I save that one for when I'm getting desperate!

15. Arrive at the hand-in only to find that the artwork has dropped down behind the mat 

This only happens to people who mat their artwork and do NOT use the proper method for hinging artwork to a mat (or use a framer who hasn't got a clue!)

16. Procrastination 

It goes without saying that this underpins that old adage "By failing to prepare you are preparing to fail". Of course for the next exhibition or next year you'll do better....

You may have realised by now that I've been preparing for an exhibition. The problem with knowing what can go wrong is I still get the heebie jeebies even if almost everything goes OK.

So what's been the big mistake you made - or only just avoided?


Please leave a comment or send me an email with your BIG MISTAKE or NEAR ESCAPE!

Florum


The annual Florum exhibition was started with the aim of creating a colourful and inspiring mix of works celebrating plant life. 

I've got artwork in the Florum exhibition which opens to the public at Kent Wildlife Trust's Sevenoaks Wildlife Reserve on Saturday.
I'm stewarding all day next Friday if you'd like to come and meet me as well as see the exhibition.
I'll be doing a review of the exhibition on this blog at the weekend.

Sunday, January 31, 2016

How to avoid frames eating your profit

This is the second in my series of ten articles about how to be a cost-effective artist - for "The Artist" magazine.

This one is about framing.  That's because framing has the potential for eating into any profit you make in a major way. However there are a number of different ways to contain costs and this article suggests some of the ones I know about.

What's your best tip or favourite tactic for keeping a lid on your framing costs?

The top of my article on page 66 of the March edition of The Artist Magazine
It's now available online and at all good newsagents

Friday, December 11, 2015

The reasons why frames for art change over time

I learned a few new things about framing art while writing this week's blog post Do frames help to sell art?

Today's post is also about framing and shares some facts you might not be aware of.

You can find the references to articles read in arriving at a wider knowledge of framing and framing choices at the end of the article.

The purpose of a frame


A frame has four main purposes. It serves to:
  • support and protect the artwork
  • make it easier to hang
  • separates - and connects - the painting from its surroundings 
  • enhance its presentation - and avoids our attention being distracted from the painting
Picture frames have traditionally been made out of wood. The type of wood and the design of the frame - and the way the wood is jointed and bonded - tells us a lot about 
  • where a frame comes from, 
  • the age of a frame and
  • the expertise of the person who made it.

Frames Change


Frames change for four reasons:
  • a change in technology
  • a preference for buying new over trying to conserve
  • a change in ownership
  • a change in fashion
most of the frames on paintings in the Gallery are not original to the works they now surroundA Bounty of Frames | National Gallery of Art (Washington DC)
and
Throughout most of the modern (that is, post medieval) era, original frames were discarded whenever a painting changed ownership, and a new frame more suitable to the work of art's new surroundings was provided.Metropolitan Museum of Art | Heilbrunn Timeline of Art History

A change in technology


The Museum of the Rhode Island School of Design and their Manual a resource about art and its making has have a fascinating article about Framing Art and the Art of the Frame By Ingrid Neuman

Early artwork is most likely to retain its original frame


Between the 13th and 15th century art was typically painted on boards and the frame was an integral part of the woodwork and the artwork. Consequently where the painting has survived, it's very often the case that its frame has survived too.

There were three types of frames:
  • Integral - Frame and painting were made of one piece of wood. The surface for the painting was hollowed out of a plank which provided the frame surround. 
  • Semi-integral - This is similar to the integral frame except just the uprights were made of the same wood as the panel. It's a more unusual approach to framing.
  • Engaged - the mouldings for the painting were made and attached by glue and nails to the board for the painting before the artist started to paint. The entire construction was then painted with gesso before the painting was started.
For more information read Early Frames: Integral, Semi-Integral, and Engaged

So if you are particular about what sort of frame is used by your artwork maybe you should start painting on boards? :)

Technology changes post 15th century


As technology changed - painting moved from board to canvas backed by stretchers - the frame became separate from the artwork.  From this point on artwork might have several changes of frame in its lifetime.

From 1800 in France, there was a move to find mechanisms for the mass-production of frames rather than carving frames one at a time. By the end of the 19th century, frames were being mass-produced and the artisan frame was a thing of the past.

Changes in approaches to conservation


In the past, many galleries have preferred to give a painting a new frame rather than try and conserve an older frame already attached to it.

Today reputable art galleries and museums will typically try to match any frame to the period of the painting - and if that means trying to conserve a frame which fits the period of the painting then this is what they will do

In addition, frames are also considered works of art in their own right and some now change hands for very large sums of money.

Change in ownership - the most frequent reason for a change of frame


Most art galleries and museums know that the paintings they exhibit are probably not in their original frames. It was traditional for a long time for the owners to put their stamp on their acquisitions by reframing them in the style of the present day.

The frames that we see on older paintings today in exhibitions in museums and art galleries have probably been chosen by an owner rather than the artist.
It's a tradition that still exists and one which pervades every part of the art market from investment art to wall art which is strictly decorative.

One of my framers told me a long time ago that the bulk of his business came from replacing frames on artwork. The collectors liked the artwork but the frame simply didn't fit in their home - and it had to go.
TIP: An artist should ask him or herself very serious questions about what sort of budget he or she should allocate to frames. Especially if the frame played no part in achieving the sale and is likely to be removed as soon as the purchaser gets the painting home. Think about it....

Changes in Fashion

The importance of changes in fashion should not be under-estimated. The design of frames has changed many times over the years.
Pictures have always been required to live unobtrusively among furnishings of a period not their own, and frames have always been the vehicle enabling them to do so.Metropolitan Museum of Art | Heilbrunn Timeline of Art History
What changes design is FASHION!

What changes frames is fashion coupled with the changes in technology and the movement from artisanal frame-making to mass production e.g.
  • Black frames are associated with Dutch art and interiors of the 17th century
  • Gilding became very fashionable in the era of the Baroque and the Rococo. 
  • Frames became a lot flatter and simpler during the neo-classical era dating from the 1780s
  • Post French revolution, mass-manufacturing approaches heavily influenced the production of frames. Hence cut lengths of lengths of moldings joined together replaced frames which were hand-carved.
  • The use of the painted white frame became very popular in the late 19th century - particularly among the Impressionists.
  • Contemporary frames today tend towards being very flat and unobtrusive
  • Many contemporary works of art have no frames at all.
Fashion is one of the main reasons why artists of today need to pay attention to the nature of the changing environment and decorative fashion relating to the homes in which their artwork is likely to hang.
EXAMPLE: Once upon a time - not too long ago - we used to have huge ugly black boxes sitting in the corner of a sitting room - next to the huge black boxes which contained the stereo system. Today these have been banished from very many homes. People fell over themselves to buy very slim, very large televisions with a minimal frame - to hang on their wall. Plus music is now played by any number of other slimline devices. Hence - if you haven't changed the style of your frames in the last ten years now might be a very good time to take a long hard look at how decoration has changed.

The Artist's approach to framing 


We're told that the frame is really important to how a painting is displayed and yet.....
  • most of the images of paintings that we see in books and online are the artwork alone - minus the frame. 
The market in images has no room for frames. Magazines, newspapers, exhibition catalogues and art books act as if they don't exist, cropping them out of reproductions even when the painters saw them as integral parts of their work.
Edge trimming | The Guardian
  • I'm often really surprised when I see a painting in person - complete with frame - and it turns out to be something I wasn't expecting. It doesn't seem to fit the artwork - and this might well be because.....
  • very many, if not most, of the paintings we see on display in art museums and galleries are not in their original frame (see 'changes in ownership' below)
For example - see the picture below (from the National Gallery's exhibition about Inventing Impressionism) of Monet's paintings of Poplars on the River Epte.

All the paintings are of the same subject by the same artist - but every single frame is different. Some suited the paintings better than others - with the overly ornate appearing to be very much out of sync with the subject and style of the painting.

To my mind some of these are examples of what can happen when paying a lot of money for a painting seems to equate to a vicarious need to put the fanciest gilt frame on it to signify its value.

Five of the series of paintings of Poplars on the Epte by Claude Monet
By way of contrast, in 1895, Monet chose to exhibit another series of paintings - of Rouen Cathedral at different times of day - in a series of frames which had been made two hundred years earlier

Many of them are displayed today in their original frames - as chosen by Monet - in the Musee d'Orsay. You can see my photo of them from my visit in 2009 below.

Three views of Rouen Cathedral by Claude Monet

Painters design their own frames


I'm guessing that a lot of us are not aware of the artists who did take an interest in how their work was framed.

The article "'Pictures properly framed:' Degas and innovation in Impressionist frames" by Elizabeth Easton and Jared Bark in The Burlington Magazine. September 2008) tells us that
(Degas) was the most inventive and energetic frame designer; over forty profiles exist in his notebooks, spanning several decades, from the 1850s until the 1880s, with a concentration from the late 1870s until the mid-1880s
Looking at European Frames: A Guide to Terms, Styles, and Techniques By D. Gene Karraker - which you can read on Google Books - tells a story of how artists took control of how their paintings were framed.

EXAMPLE: Impressionist and post-impressionist

The Impressionists made radical changes in both the style and the colour of their frames Looking at European Frames By D. Gene Karraker
  • in the 3rd Impressionist exhibition in 1877, Degas and Pissaro both exhibited their work in simple white frames 
  • Whistler advocated the use of white frames to enable works to stand out better
  • Paul Gauguin carved his own frames
  • Van Gogh once painted a frame to match the dominant colour of the painting
The Bark Frameworks blog has a number of fascinating blog posts about how Degas framed his pastels
First, we look to the artist’s own preferences; then, to those of his contemporaries and peers. Finally - especially if examples of these are few - we look to those of dealers and collectors at the time.
    • it also shows you the sketches made by Degas for the profile of a simple frame
By way of contrast, Cezanne was not in the least bit interested in how his paintings were framed and seemed very happy to leave decisions about framing up to his dealer Vollard.

More information:


Tuesday, December 08, 2015

Do frames help to sell art?

I was very taken with the new frames being used by a very well established member of the Royal Institute of Oil Painters at their annual exhibition last week.

So much so that this was the first photo I took.  I really loved the way the frames were neutral and unassuming and enabled eyes to focus purely on the painting.

Oil paintings by Roger Dellar ROI
red dots indicate two have sold
By the time I'd been round the exhibition twice I realised that I was also beginning to notice something else about frames.

That's when I went round again - and this time I counted.

Now what follows is not scientific. Also, it of course takes no account of the quality of the painting or the reputation of the painter or why the paintings in question sold.  Plus I didn't manage to track down every sale so I've got one or two gaps. It was also done relatively soon after the exhibition opened and there will be more sales by now.

However even I was surprised by the result.

Tomorrow I'll tell you about what I found about different types of frames while writing this post. You may well be very surprised!

First let me describe what I mean by my description of the frames - and what the results were of my count and analysis.

Different Types of Frames


I categorised the frames into four different categories
  • traditional frames
  • traditional with gilt
  • contemporary wood
  • contemporary painted

I counted frames which leaned towards traditional  as contemporary if the profile was relatively simple and in all other respects conformed to the contemporary painted frame i.e. single colour which is NOT saying "look at me".

Wednesday, October 28, 2015

How to hang a painting - using mirror plates

This is the third post in a series of posts about how to hang a picture using different types of hanging hardware

This post considers what a mirror plate is, why use mirror plates and how to attach them to a frame.

The previous posts are:

What is a mirror plate?


A Mirror Plate - also known as a picture frame plate - is a piece of metal (usually brass) designed to lie flat against the back of a mirror or picture frame. It's then used to attach the mirror or picture frame to the wall - usually using screws.

This is what a mirror plate looks like.

A brass plated mirror plate

They come in different sizes and can have different sized screw holes. The screw holes are usually flat on one side and counter sunk on the other side.

They are normally solid brass, brass plated, nickel plated or carbon steel. Some have three plain holes while others have two plain holes for the frame and a slotted hole. Some are completely flat both sides, others have a one side which is counter sunk.

For larger works, the plate is normally rectangular and includes a number of holes for additional security.

You can see a range of mirror plates in the selection offered by
Other suppliers also have them and you should be able to find them in store at the major DIY stores although they sometimes don't list them online.

You also need the appropriate sized screws to fix them. These should be the same metal as you select for the plate (eg brass screws with brass plates). The screws also need a surface which will take screws!  Do not use nails as they are not generally not strong enough nor long enough!

If you are hanging anything very heavy you will also need rawl plugs and longer screws and heavy duty plate fixings.

Why use a mirror plate?


The benefits of using a mirror plate are as follows:
  • the frame is secure on the wall and cannot be removed without the use of a screwdriver. This is why they are often a standard fixing for exhibitions where you want to ensure nobody can lift a picture off a hook and walk out with it. 
  • the frame is flush to the wall and does not lean out in any way. 
  • frames which include mirrors or glass are safe. If anybody brushes against the frame it will not move and cannot be dislodged easily
  • It enables you to position a frame accurately on a wall. You don't have to guess where it will end up once the slack in the hanging wire is taken up
The downside of a mirror plate is that you are left with a hole when you take the picture down. However this can be filled and painted over. This is what very many galleries do all the time.

How to fix a mirror plate into a frame


Assembly Kit: You need:

Friday, October 23, 2015

How to hang a large or heavy picture - using heavy duty hanging hardware

The critical factors you need to know when hanging a heavy picture are:
  • what weight the picture is
  • what sort of hanging hardware is best for the job
  • what sort of wall you are hanging it on.

'How to hang a picture' series


This post considers how to hang a heavy picture, why use heavy duty picture hangers and how to attach them to a frame.

It's the second post in a series of posts about how to hang a picture using different types of hanging hardware.

What is a heavy picture?

In plain simple terms:
  • a very heavy picture is one which you wouldn't think twice about trying to hang without an extra pair of hands.  The issue is NOT whether you can lift it. It's about whether you have the strength and motor control in your upper body to execute a manoeuvre to hook it onto the wall on two sides - while holding it above your head.
  • if you would struggle to hang a picture on your own because of size or weight then you ought to be thinking seriously about heavy duty hanging hardware - and checking the wall!

What's the issue with walls?


This is the question frequently not asked by people whose large and/or heavy paintings fall off the wall.

INTERIOR Walls / Drywalls


Interior walls are built using a wooden framework and some form of covering - often plasterboard in modern houses.  They're not really suitable for hanging anything heavy. Light and medium sized pictures can be hung on dry partition walls using picture hooks which are hammered into the walls using long hardened or steel pins.

However steel pins are not long enough nor are they strong enough to hold heavy weight pictures and should NOT be used - unless you want your picture to fall off the wall.

Ideally you should aim to hang medium sized pictures where the stud frame is (i.e. into wood which provides a more stable structure) but the chances are the location of the wall stud does not fit where you'd like to hang your picture.  To check their location you need to use a stud locator.

My studfinder - invaluable for older properties and where you have drywalls.
If you know the drywall is robust you can use a special anchor for dry walls.

If like me you live in an older house you might find that some of your original interior walls are made of lath and plaster and the rule for these is you absolutely MUST find the wall studs before you hang anything. (I've got a shelf at the top of the lathe and plaster wall I'm currently facing - however it has heavy duty shelf brackets in every single stud as it crosses the wall!)

All the artwork I possess - except for the smaller lighter works - are hung on brick walls - see below.

EXTERIOR or load bearing walls


Domestic homes will always have exterior walls and load-bearing walls which are suitable for hanging items which are a heavy weight. Typically in the UK the wall is a solid masonry (brick or stone) wall or a concrete block wall.

These are the walls from which to hang a very large or very heavy picture (or mirror i.e. there's a good reason why very large mirror are very often found on chimney breasts). That's because this type of wall can take the longer screw length which might be required to get a solid fix.

If you're hanging artwork in another sort of space you need to check what sort of wall it is.
  • Banging on the wall often provides a good indication. If it sounds hollow then it's an interior dry wall. 
  • The other trick is to bang in a nail. If it's easy to hammer in then chances are it's a drywall. If it takes a lot more effort it's probably a masonry wall. If it's really difficult to impossible then it's very likely you've hit concrete and only drills and screws (and a heavy duty electric drill) will work.  The same can be said for good quality exterior brickwork.
One further consideration is the decoration. 

If you think you might want to move paintings around a lot I wouldn't favour walls which are wall papered!  It's easy to fix holes in a painted plaster wall - but sorting out multiple large holes in nice wallpaper is a bit of a challenge!

What is heavy duty hanging hardware?

Heavy duty hanging designed to provide a more secure fixing to large and/or heavy pictures. They're made of more robust metal and commonly have at least two if not three screw holes.

It requires TWO bits of complementary hardware:

  • the heavy duty hanger -  this is a flat steel plate with a a hanging loop at one end which is fixed to either side of the back of the picture frame. It's often plated in brass and has at least two and often three holes to ensure a secure fixing should any one screw work loose. They are often between 50mm and 90mm in length.  They can have either:
  • the heavy duty J hook - this is fixed to the wall and is the mate for the heavy duty hanger fixed to the frame. It provides the secure structure over which the D ring or loop is hung. 


Why use heavy duty hangers?


Hanging is basically as good as the weakest point within the apparatus and the level of tension placed on any weaknesses.  Hence in general it's advisable not to use wire and d rings for very heavy pictures because it's been known for the wire to create a lot of strain that in turns pulls a one screw D ring out of the back of the frame - and the picture comes crashing down.

Heavy duty hanging hardware prevents:

Thursday, October 22, 2015

How to hang a picture - using D Rings

I'm going to be doing a number of posts about how to hang a painting. These will consider different aspects of what's involved in hanging a painting and hanging an exhibition.

This first post will consider how to hang a picture frame using D rings - using two different approaches for different size and weight of picture - and includes images and videos to show you how to use D rings.

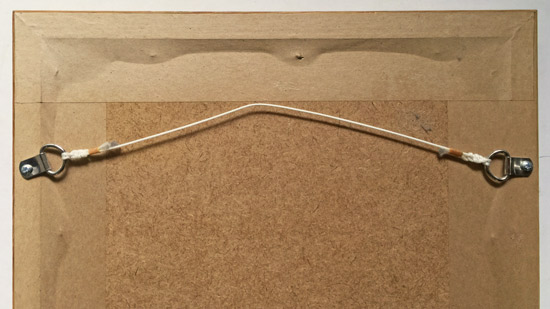
A small artwork framed using D rings as hanging hardware
Note how the professional framer has used single strand of picture cord
and then knotted and and whipped the ends
If you find this post helpful please share it with your friends and/or share using Twitter or Facebook.

Update: The next two posts are:


What are D Rings?


D rings are a very common type of hanging hardware used by professional picture framers and also available to all artists via retailers in the high street and online (see below for links to some of these in the UK).
  • They comprise a ring - in the shape of a letter D (hence the name) and a plate with a screw hole.
  • D rings are always used in pairs - screwed into the back of the frame. 
  • They can have one screw hole or two. One hole is suitable for lighter works. As the weight increases (eg medium sized pictures) use a D ring with two screws for greater security.
  • The ones most commonly used for small works are nickel plated.  
  • The type of screws used should be matched if possible to the type of D ring used.

Use of D Rings:

  • Which way the D Rings are screwed into the frame depends on the size/wight of the picture and which method is used for hanging using D Rings (see below for smaller/lighter pictures and tomorrow's post for larger/heavier pictures)
  • They are usually made of steel with a nickel or brass plating. The cheapest are zinc plated.

For heavier pictures:

  • The nature, composition and size of the D ring usually changes as the size and weight of the framed artwork increases.
  • The plate part of the D Ring extends and the number of screw holes increase so that the load is spread. 
  • The location of the D ring on the frame also changes to ensure a secure hang.

Why use D Rings


D rings are:
  • Much stronger than the small screw eyes or screw rings which should only be used for very light items 
  • Much more suitable for framed artwork which is other than small. As a rule of thumb, if the size of my framed artwork is about the size of an A4 piece of paper or bigger I would always use a D ring. 
  • Enable the hanging wire or cord or chain to be threaded easily. 
  • Hardware which lie flat. If taped over, they won't damage other frames when pictures are stored in stacks (very common in open exhibitions and for any artist producing a lot of work)

How to attach D Rings to hang a picture


There are basically two approaches to hanging using D Rings.